yeremia saidmaybe even re-insert your memory cards
I found this solution on internet. how this could actually help? I don’t understand
yeremia saidmaybe even re-insert your memory cards
I found this solution on internet. how this could actually help? I don’t understand
Once you put them in again they should have better contact with the motherboard (also make sure to clean any dust that may have collected in and around the slots). It can be tricky, don’t do it if you’re not sure how… It’s always better to ask an expert then to fry your motherboard or memory 
my computer is fine, is adobe software who have issues. 
in part is “my fault” with using many layers in 3D space but other than that I don’t see why i should take my computer apart when other “heavy memory” software like 3DS Max works with no problem on the same system.
or maybe is some other issue that is not adobe fault
You can’t compare AE with a 3D program. They do fundamentally different things in different ways.
I suspect you have somehow created an image buffer that’s too big and then replicated it 80 times with the stacked 3D technique. Looks like AE’s running out of RAM before it gets to a stage where it can dump all that stuff to disk cache.
Most crawling renders and out of memory errors are to do with too big image buffers… usually importing a good old fashioned 6K graphic where a 600pix one would have done. Turning up the accurate setting on the vector probably has a similar effect.
Depending on how you structure your project and how you use the Collapse toggle on layers, AE may have to put the same image into its RAM buffer over and over again. How big is the composition that you have the vector graphic in? Or are you stacking raw iterations of the vector? Maybe that’s the trouble.
I agree, it’s not always transparent, what After Effects is doing and why, but I’ve generally found that as of CS5 (i.e. 64bit) most of these kind of problems are workaroundable. That wasn’t the case in CS4.
Oh… by the way… another possible absolute memory killer… Are each of your 80 stacked layers set to cast and receive shadows? If so you are creating 80 comp-size-or-bigger shadow maps per frame. This could be the problem… you’re using your entire RAM buffering unnecessary shadows. It also won’t achieve much in terms of making the sides look like they’re shaded. You need to use other techniques there. How does it RAM preview at full res with Draft 3D turned on?
DoF won’t help either. You could render with motion blur off and use a CC Force Motion Blur effect on the top comp. This forces the motion blur to be done in a different place and tends to get rid of some out of memory problems… it’s steadier, more reliable, gives better visual results with stacked 3D extrudes, but will generally take longer than AE’s native cheat. (i.e. per layer motion blur)
P.S. Have you tried 3D Extruder? It automates all of this stuff.
I did not used shadows but some layer styles, effects off course, and compositions inside compositions.
I think you are right I may have hit some limit with all this comp inside comp. Tomorrow I need to rethink the whole thing to make it lighter.
The RAM render well at full quality, but probably AE doesn’t calculate accurate antialiasing during RAM previews.
The structure is like this:
Vector logo inside COMP VECTOR
COMP VECTOR inside COM CLEAR
couple of COM CLEAR with layer styles and effects for the top layer in the layer stack we have -> COMP TOP OF 3D STACK
COMP TOP OF 3D STACK on top of 20 copies of COM CLEAR to get the 3D effect -> COM 3D EFFECT
Inside the COM 3D EFFECT is a dummy camera controlled by the camera in my MAIN COMP
in MAIN COMP I have the COM 3D EFFECT and a copy of it mirrored to get reflection on the floor.
all works pretty well if I use “Faster” on the vector inside Interpret footage, if I turn on “More Accurate” then error. But not imediatly, it renders 30% of the frames.
don’t know if is clear what I have said.
3D Extruder looks great, but less plugins probably more buyers.
doru said3D Extruder looks great, but less plugins probably more buyers.
3D Extruder only generates standard After Effects comp structures. Once you’ve run it, the buyer doesn’t need 3D Extruder to use the project.
Collapsing transforms is a good way to use precomps organisationally without actually changing the render order. It’s usually a more efficient way to render. You can think of it as though all layers inside a collapsed comp are to After Effects actually inside the main comp. If a comp isn’t collapsed, then the contents of the comp are rendered to a separate buffer and then that is dealt with pretty much as though it were footage.
Of course if you do have a lot of comps nested, you could always consider rendering them and setting a full res. proxy (then using proxies when you render). This is often a pretty efficient way to render with big, structurally complicated projects.
Finally, I guess it goes without saying that you should render to an image sequence. That way, if the render bombs out, you can pick up where you left off.
You may also find that force purging the RAM cache after X frames during render (otherwise known as the Secret Settings) helps. Google “After Effects Secret Settings”.
Also, if you’re rendering with Multi-processing, of course try turning it off. Multi-processing isn’t always quicker or more efficient.
As for trying to understand your comp structure from a forum post… I’m not going to bother.
I will check 3D extruder right now. thank you for the tip,
I had use the collapse transformations. It doesn’t work with out it (another couple of hours lost on this one two days ago ). I get weird renders.
thank you all for the help I received!
one more question, did anyone of you use that antialiasing option for the items you sell on videohive?
this one here

In some cases secret option helps. It can purge your memory automatically after xxx frame (xxx - set your own number) while rendering.
While holding down Ctrl+Shift, go to Edit -> Preferences -> General
You’ll see new “Secret” section at the bottom of the list
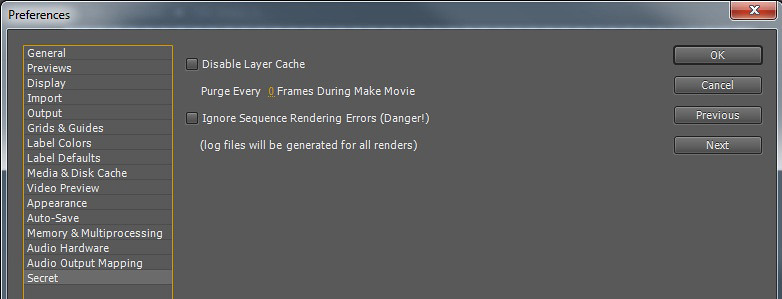
It helped me many times, but after CS5 came out, I’ve never used it…
doru saidone more question, did anyone of you use that antialiasing option for the items you sell on videohive?
this one here
Never used it. I just make sure that collapse is on for all vector graphic layers and it seems to do the trick.
Can’t say I’ve ever noticed any softness / anti-aliasing artefacts.
well, then I will not use this feature. If the buyer want to enable it, then he needs to have an adequate system to render the project. In the end, even if I manage to reduce the complexity to the point that my computer can render it, someone who will purchase the project may have a computer less powerful and get the same problem I have.
I will rethink the entire structure anyway to make it more lighter but I will stay away of that antialias option for now.
@5p1r17 thank you for the tip, I’m sure that I will use it in the future if I will have render problems.
As I said previously, my concern is to have a “bug free” project to upload on videohive, something that the normal user can open in After Effects, change the logo and/or text, hit render and do his job. If is not working on my computer, even if somehow it will get accepted, then I will get angry buyers in front of my shack with torches to burn me down
I may manage to render to image sequence, enable log file to see what frame the render failed, re-render couple of more frames, use secret preferences but if someone just want a flv file out of the project, it needs to work.
doru saidwell, then I will not use this feature. If the buyer want to enable it, then he needs to have an adequate system to render the project. In the end, even if I manage to reduce the complexity to the point that my computer can render it, someone who will purchase the project may have a computer less powerful and get the same problem I have.
I will rethink the entire structure anyway to make it more lighter but I will stay away of that antialias option for now.
@5p1r17 thank you for the tip, I’m sure that I will use it in the future if I will have render problems.
As I said previously, my concern is to have a “bug free” project to upload on videohive, something that the normal user can open in After Effects, change the logo and/or text, hit render and do his job. If is not working on my computer, even if somehow it will get accepted, then I will get angry buyers in front of my shack with torches to burn me down
I may manage to render to image sequence, enable log file to see what frame the render failed, re-render couple of more frames, use secret preferences
That makes sense. After Gallery, I decided to make only simpler projects for Videohive. I spent at least as long optimizing Gallery so it would be easily renderable in CS4 (all the lighting / shading / architecture is built in After Effects 3D using fully procedural means). Optimizing was a long and boring process with much render testing. Although I learned a lot along the way too, actually in terms of optimizing, which is always useful knowledge; I probably won’t be doing it again.
You can push AE to render extremely heavy duty things, but only if you know what you’re doing in terms of structuring your workflow with collapses, proxies, prerenders, frame baking etc.
Your average template buyer wants something easy… and that means simple.
Just a thought… If you have two disk drives never place output file on the same drive where your project files are. You’re just overloading it with constant reading/writing operations. The best option is to make one hard drive read and the other write
You’re sort of right, but I think that’s practically a bit over the top, since most people want to keep projects all together in one place. Anyway, I don’t think that AE tries to read source material and write to output files simultaneously. As far as I’m aware AE reads everything in, buffering to RAM and disk cache where necessary, composites the frame together and then writes it to disk. You can watch what it’s doing in the Render pane as it renders. Maybe read and write operations do potentially clash in multi-processor mode, where multiple iterations of the AE render engine are running independently.
What does make big sense though is to have OS / application, project and disk cache on three physically different disks. That way, OS level virtual memory stuff takes place on one disk. AE’s disk cache is on another disk and the project read / write operations are happening on a third disk.
The faster the drives, the better. i.e. RAID0/RAID5 or SSD, hooked up over something fast… PCI / Thunderbolt / SATA III / SATA II
If it buffered everything, render would be very very fast. Imagine hitting the render after a heavy project customization (without clearing the cache). It has loaded all sorts of data (cache for half res, quarter res, full res somewhere) so what it needs to do is to read the data again (for full res) and drive it through the ram. So it starts to read textures from a hard drive (different files for different comps) while at the same time it writes PNG images, sometimes even 8 at once (i7 with multiprocessing on). So the hard drive is busy with heavy reading and writing at the same time but if you tell it to put the MOV on the second drive that will eliminate the writing task for the first drive on which the project files are. I’ve tested this on my PC and there is a noticeable increase in render speed
Farley_Design saidSo it starts to read textures from a hard drive (different files for different comps) while at the same time it writes PNG images, sometimes even 8 at once (i7 with multiprocessing on). So the hard drive is busy with heavy reading and writing at the same time
Yes. Only with After Effects multi-processing turned on… i.e. separate render cores, working independently.
An individual AE render core reads everything in, processes it (using RAM and disk cache) and at the very end compresses and writes the frame to disk. In that order. As I mentioned, you can see this in action by twirling down Current Render in the Render Queue. Anything that’s written in between times is written to RAM, to the AE disk-cache or to the OS disk’s virtual memory.
In my experience, multi-processing gives by far the biggest speed boost where processor heavy stuff outweighs read/write operations. For instance, using multi-processing for a transcode isn’t much use, whereas for a large comp with many AE lights, depth of field, motion blur etc. it is.
What I’m kind of saying is that there are other ways round problems than simply throwing more hardware at it.
I have another question.
Should I do my project in HDTV 1080 29.97 - Square pixel? Or 30fps? What about bits per channel. 8, 16, 32?
The project to be uploaded on videohive I’m referring to
doru saidI have another question.
Should I do my project in HDTV 1080 29.97 - Square pixel? Or 30fps? What about bits per channel. 8, 16, 32?
The project to be uploaded on videohive I’m referring to
8 bit’s good enough for most Videohive customers. They don’t usually tend to notice the small artefacts that creep in due to 8 bit… and most video formats and screens are 8bit anyway.
1080 line HDTV definitely… it’s a standard. Square pixel is part of the HDTV standard. There are variations, but the main one is square pixel.
As for frame rate, take your pick. I tend to prefer to make projects that are frame rate independent if possible. That’s a bit tricky with pre-renders… although you could cheat it and do something like 120fps h.264. Since h.264 remembers changes (interframe codec), the high frame rate shouldn’t affect the data rate too adversely. This number is divisible by 30 and 24. You can make a 25 version by speeding up the 24 4% (like they do for feature films). And a 29.97 is easy enough from a 30. Once again, a very slight speed change in the footage in AE. (or a drop frame if you prefer)
All this can be set up in comps. All the user has to do is decide which one to render.